

Best way to combine Audio and Video in Capcut
January 17, 2025
Step-by-step Guide to make Gaming Clips in Capcut
January 17, 2025
Imagine you need to post an urgent reel or TikTok, and the video is lagging while editing. Feels frustrating, right? Not only will your positioning timeline get delayed, but it will also retain pending edits to cover.
No one likes a laggy video in between editing. It not only slows the editing process but also lowers our productivity. A disruption in video editing flow can also impact your creativity. Apps like CapCut are designed for fast and smooth editing. But sometimes high-resolution videos lag.
Many video editing professionals, especially newcomers, face this issue. Being a user of this app for years, I also experienced this problem. I have tried many hacks and tricks to find a perfect solution to fix this issue. If you are also in search of the right solution to fix this lagging video in CapCut, this article is for you! I have given the most effective yet quickest solution to solve it within a minute. And, that too without affecting video quality! Keep reading to learn more about it in detail:
Why Do Videos Lag While Editing?
Here are the top reasons behind the situation:
- Outdated graphics drivers, low RAM, weak CPU, and slow hard drives.
- Software incompatibility with a specific codec or video format.
- Software bug, glitch, or crash.
- High bitrate with high resolution
- Too many layers, transitions, animations, and effects added.
- Slow and weak internet connection
What Is Video Lagging?
Technical glitches, errors during the download process, or complex editing on a weak CPU or low RAM result in videos lagging.
How To Fix A Laggy Video In CapCut?
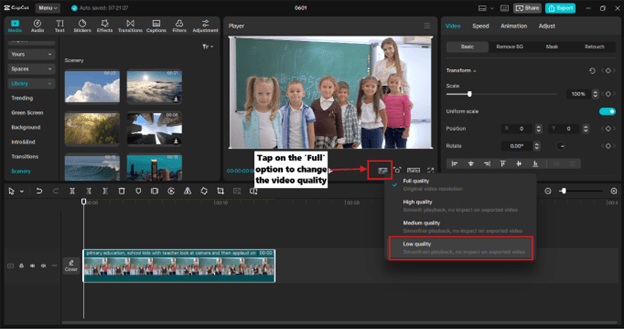
Step 1: Change the Video Quality:
Let’s say this is the video that is lagging. To solve this issue, tap on the ‘Full’ option on the right side. It shows video quality options such as- full, high, medium, and low.
Change the resolution from full quality to low quality. Doing this will help to reduce the lag without affecting the video quality after exporting it.
Try editing the video again to check the lag.
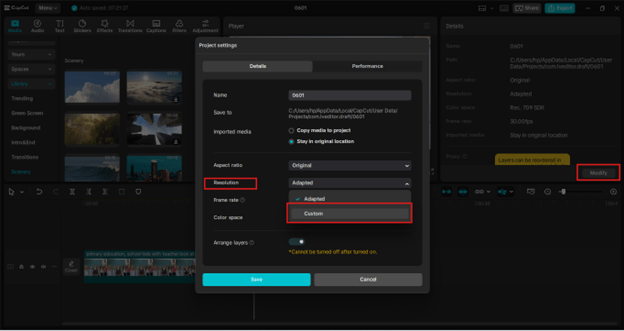
Step 2: Editing The ‘Modify’ option
If the lag is still there, you need to make changes in ‘project settings’.
Make sure you have not selected any video clip. For that, click anywhere on the timeline except the video that is added. You will see the ‘Modify’ option in the middle right corner.
- Free up some space in your phone by deleting heavy files or uploading them to cloud storage.
- Close all the apps other than Capcut, as that will free up the RAM on your smartphone.
- If none of that works, then restart your phone and follow the above two steps.

Tap on ‘modify’. It has two project settings tabs: details and performance.
Click on the ‘Details’ tab and tap on ‘resolution’ settings. It is set to ‘Adapt’ by default. Change it to the ‘custom’ settings. Here, you can manually enter a lower resolution for your video.
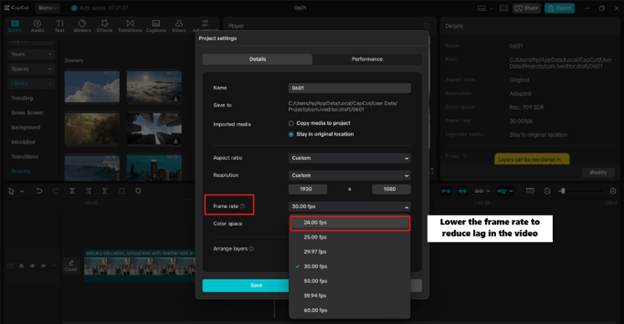
Along with resolution, frame rate also plays a major role in lag. The higher the frame rate, the lower the performance will be.So, click on the ‘Frame rate’ option in the Details section of project settings. Choose a lower rate in between 24 fps to 30 fps to increase the video’s speed.
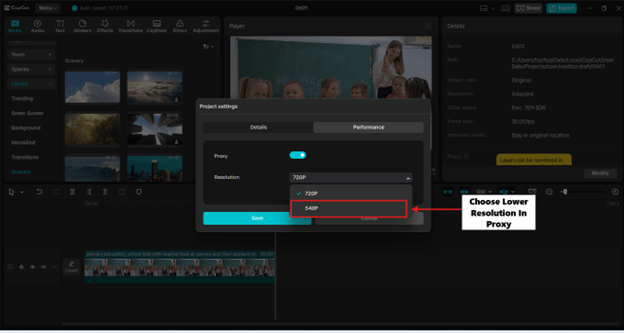
Step 3: Change the ‘Performance’
Now, in the same project settings in Modify, go to the ‘performance’ tab. You will find a scrolling tab for ‘proxy’ settings in there. The proxy is turned off by default.
Click on the toggle bar and turn on the proxy. The ‘Proxy’ setting gives a smooth video, speeding up the editing process. And, the video quality will not get compromised after exporting it.
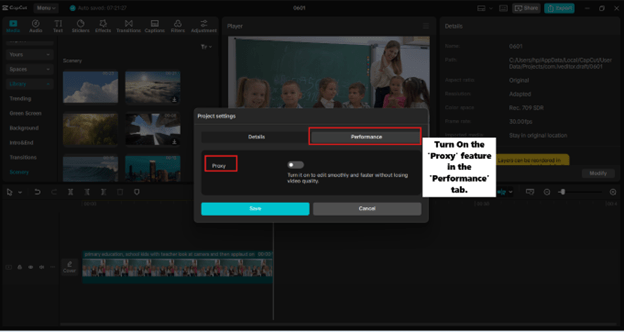
Click on the ‘Save’ button to save these settings of resolution, frame rate, and proxy. Doing this will hardly take 30 seconds to get a smooth and editable video.
Other Ways to Fix CapCut Lagging on PC:
Clear CapCut’s Cache:
Save the edited video, which is lagging. Return to the homepage of the CapCut app. Click on the ‘Settings’ option at the top right corner. It looks like a hexagon with a small circle in it.

Open settings and move to cache settings.
In cache, CapCut offers to auto-delete caches in a specific number of days (90, 60, 30, or 15). You can choose according to your editing load and the frequency of using this app. Set the cache cleaning to auto mode so that you can enjoy video editing with fewer chances of lagging.
If you want to go with auto mode, you can manually delete caches using the option named ‘cache size’. It shows how much cache for CapCut is stored in the system. Click on the ‘delete’ icon to remove the stored cache. Make sure you visit the settings from time to time (monthly, weekly, etc.) to clean the caches.
Click on the ‘save’ button after deleting caches. This reduces strain on the app and videos get edited smoothly. Also, make sure that all your video editing data is well-synced online before deleting caches.

Fulfill Minimum Requirements:
Ensure that you are fulfilling the minimum requirements for CapCut on Windows to run the editing process smoothly without any freezes:
- Operating system: Windows 7 or above
- Processor: Intel Core i3 or above
- Memory: 4 GB RAM or above
- Graphics: Intel HD Graphics 4000 or above
- Storage: 2 GB available space or above
Why You Should Avoid Laggy Videos For Editing?
Laggy videos cause hindrances in the smooth editing flow. After facing challenges while editing such videos, I realized that I must prefer normal videos with good speed.
So, why should you avoid editing laggy videos on CapCut?
- The file gets corrupted: sometimes, the edited file gets corrupted during downloading. It results in choppy and laggy footage. The best way to gain a normal exported video is to fix lag-causing factors and re-download it.
- Lack of storage: A low storage CPU or RAM cannot run complex videos smoothly. It can create a strain on the system. You can close all the background apps and windows to reduce strain on the software.
- Poorly encoded footage files: Encoding formats like H.264 are not compatible with optimizing the video while editing. As a result, you get undesired results after downloading the video.
- Challenges in previewing the video: Slow rendering and processing can take too much time. It also leads to choppy footage. Make sure you are using low resolution and fps for better results.
FAQs:
How To Get Smooth Video In CapCut?
Use fast internet, a laptop/ PC with high storage, a CPU speed, and an updated CapCut app to get non-choppy videos.
Conclusion:
Experience lagging is a common issue if you are editing high-quality videos (4 K, Ultra HD, HD, etc.) on a computer with a slow CPU or limited RAM. But, CapCut is there to rescue you! If you feel your video is lagging after downloading it, you can change the project settings in this app. For the most efficient result in the least time, you can lower the resolution, fps, and proxy!
I hope this guide on a quick fix for laggy video in CapCut may have given you valuable insights to solve a similar issue on your end! I have created this blog for beginners and seasoned tech lovers to grow their knowledge. For more such interesting problem-solving guides, stay connected to my blog!
Thanks!
